Combining some of the best features of ARRI's other cameras, such as the ALEXA series and the AMIRA, as well as some of the image quality improvements ARRI made when developing the large format ALEXA 65, the ALEXA Mini is a compelling option for DPs and shooters who want to realize their creative vision in a wide range of situations.
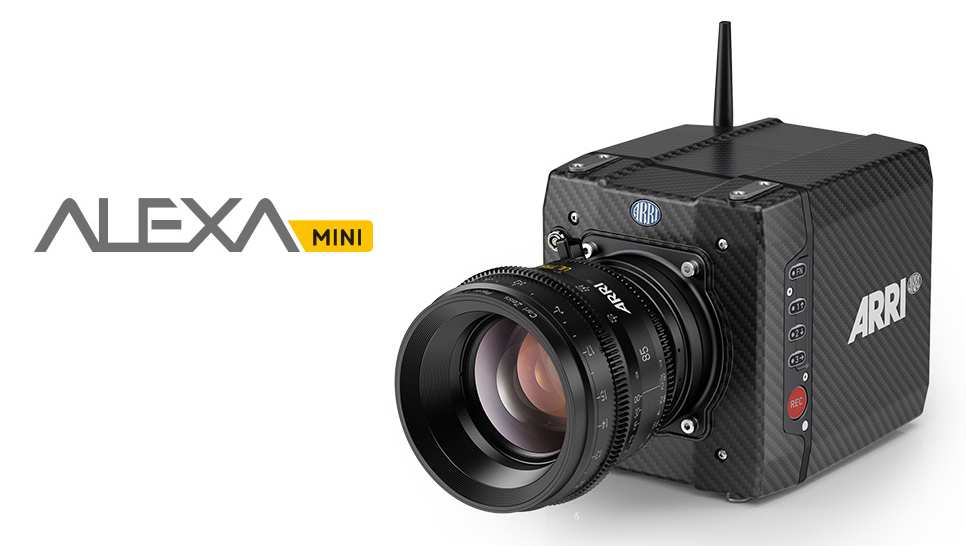
Its symmetrical, cube-like design is well suited for handheld scenarios, such as with a Ronin or MōVI gimbal, on the shoulder, or mounted on a drone for soaring aerial shots. It's equally at home in the studio as an "A" or "B" camera on commercials, music videos or narrative projects. One of the best features the ALEXA Mini "inherited" from its doc-style bigger brother, the AMIRA, is ARRI's next generation look management controls which allow for CDL-style grading directly in the camera or -- and this is the topic we'll be focusing on today -- the ability to load look files converted from 1D and 3D LUTs directly into the camera to be applied to a variety of viewing options and outputs.
When used in conjunction with the ARRI Color Tool, a free download from the ARRI website, programs like DaVinci Resolve can be used to create unique looks and load them into the camera quickly. Pomfort LiveGrade can be used to color the camera's LogC signal in real-time, and the resulting grades can then also be loaded directly into the camera. This is especially useful in situations where the camera is mounted in a position that makes doing live color impractical. Lastly, many people have large libraries of existing 3D LUTs they've found around the web, made themselves, or purchased. LUT utilities such as Lattice serve as "swiss army knives" for getting your existing production-quality LUT into a format that can be loaded into the ALEXA Mini. In this blog post we'll take a look at all three of these approaches.
In all three scenarios listed above, we'll be creating files in the ARRI Look File 2 format (aka ALF-2, filename extension .aml), placing them on the USB thumb drive that came with the camera, and adding them to the camera's Look menu. Finally, we'll apply them to any combination of the "Rec" (internal recording), "SDI" (monitor out), or "EVF/Mon." (the camera's eyepiece and flip-out LCD monitor) signal paths.
To get started, first make sure the USB thumb drive that came with the camera is ready to use. The folder structure on the thumb drive should look like the following exploded view in the Mac OS X Finder:
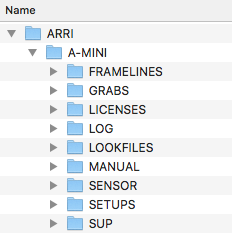 If your thumb drive's folder structure doesn't match the above, or your drive is blank, you'll need to format the thumb drive in the camera. Place the drive in the slot behind the rear door underneath the CFast 2.0 card slot. In the camera's menu, navigate to Menu → Media → Prepare USB medium and select "Confirm". You should see a message that the folder structure was created successfully. Now that our USB thumb drive is ready, we can move on to making some looks. We're most interested in the "LOOKFILES" folder which is where our .aml look files will go after being exported from the ARRI Color Tool and other programs.
A favorite among professional color graders as well as aspiring filmmakers of all stripes (the standard version is available for the low, low price of free), DaVinci Resolve is a go-to option for enhancing your footage with project-appropriate color grades that make your work stand out from the crowd. While properly "driving" Resolve is beyond the scope of this article, many tutorials are available from a variety of sources. We think one of the best ways to learn Resolve is through our own introductory class Resolve for DPs, taught in our in-house training facilities here at AbelCine. Additionally, we've added many advanced classes through our association with the International Colorist Academy (ICA).
As discussed earlier, you'll want to apply your corrections in Resolve -- in other words, create your unique look -- using footage from the ALEXA Mini shot in ARRI's LogC gamma encoded format. Once you've created a look, or "grade", in Resolve, which can be as simple as adding contrast back into a "Log" image, or as complex as emulating a long-discontinued film stock from the golden age of cinema, all you have to do is right-click on the clip's thumbnail in your Color page timeline and choose "Generate 3D LUT (CUBE)" from the resulting context menu.
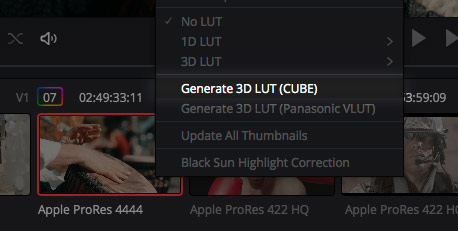
Save your LUT with a unique name. Note that only color and contrast changes to your image, including color balance, saturation or even the full-blown conversion from one color space to another (from, say, ARRI's Wide Gamut color space to REC709 for example) can be represented in a 3D LUT. Operations involving pixel math such as sharpening, noise reduction or time re-mapping cannot be represented in a 3D LUT, nor can selective operations that only affect a particular part of the frame such as Power Windows.
Now that we've saved our 3D LUT in .cube format, we're ready to convert it into the ALEXA Mini's native look format, ARRI Look File 2 in .aml format. To do this, open the ARRI Color Tool ("ACT," formerly the AMIRA Color Tool), and choose File → Open Look/LUT File... Navigate to where you saved your LUT out of Resolve and make sure the "Look" button in the top toolbar is activated. You should see the default image with your LUT, now wrapped in an ARRI.aml file, applied.
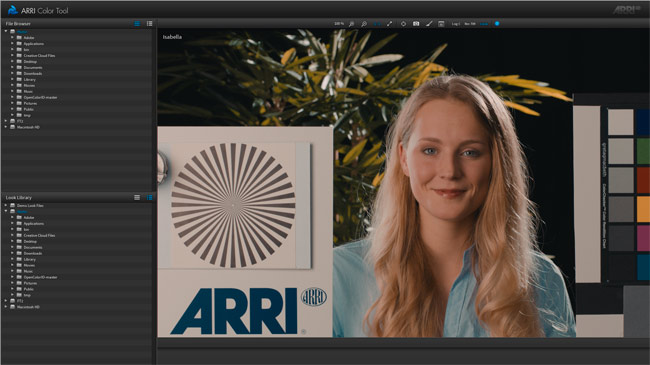
If you like the way your LUT looks after being applied, you can save it with File → Save Look as... to generate the .aml file. One important thing to look at is the resulting filename of the .aml file. It can be no longer than 28 characters including the extension. If your look file's name is longer than this, you'll need to manually edit the filename or choose a shorter filename when exporting.
Now, copy the resulting .aml file into the ARRI → A-MINI → LOOKFILES folder on the USB thumb drive that came with the camera. Eject the drive and insert it into the USB port beneath the CFast 2.0 card slot on the rear of the camera. To load your custom look file and set it as the active look, which can be applied to any of the "Rec" (internal recording), "SDI" (monitor out) or "EVF/Mon." (the camera's eyepiece and flip-out LCD monitor) signal paths, on the camera's flip out menu interface, do the following:
Look → Edit → Add → Select → Back (any key) → Set
Then, assign the current Look to the EVF/Mon option, if it isn't already, to see your custom look in the camera's EVF (or on the SDI monitor out if you are using a monitor connected via SDI to evaluate your in-camera look). If your look isn't a dramatic change from the Rec709 look normally applied to the eyepiece, you may have to switch back and forth to notice the difference.
Congratulations, you've just made a custom 3D LUT and converted it to a .aml file for the ALEXA Mini. This LUT can now be used for on-set monitoring (and further distribution to video village), for the operator/AC for composition, framing and pulling focus, and even burned into the internal recording if the look is one that you want to really commit to for the project. Alternatively, the same LUT, in its native .cube format, could be re-applied to the LogC footage in post in a variety of programs (Resolve, SpeedGrade, Premiere, etc.), or could be applied to any transcodes needed for dailies or edit media. It could even serve as a starting point for a more formal color grade after locking your edit.
LiveGrade, from Pomfort, is an industry standard application for doing live color grading on set direct from the camera. The classic workflow with LiveGrade is to run a clean Log signal from the camera's monitor or record outputs to a LUT box, such as a Fujifilm IS Mini, Teradek COLR, or FSI Box IO, and then into a reference-grade calibrated grading monitor, such as one from Sony, Flanders Scientific, or TVLogic. A computer also connects to the LUT box, usually via USB, and LiveGrade is used to apply color grades to the live signal using a set of controls very similar to those in DaVinci Resolve (color wheels for lift, gamma, gain, saturation control, etc.).
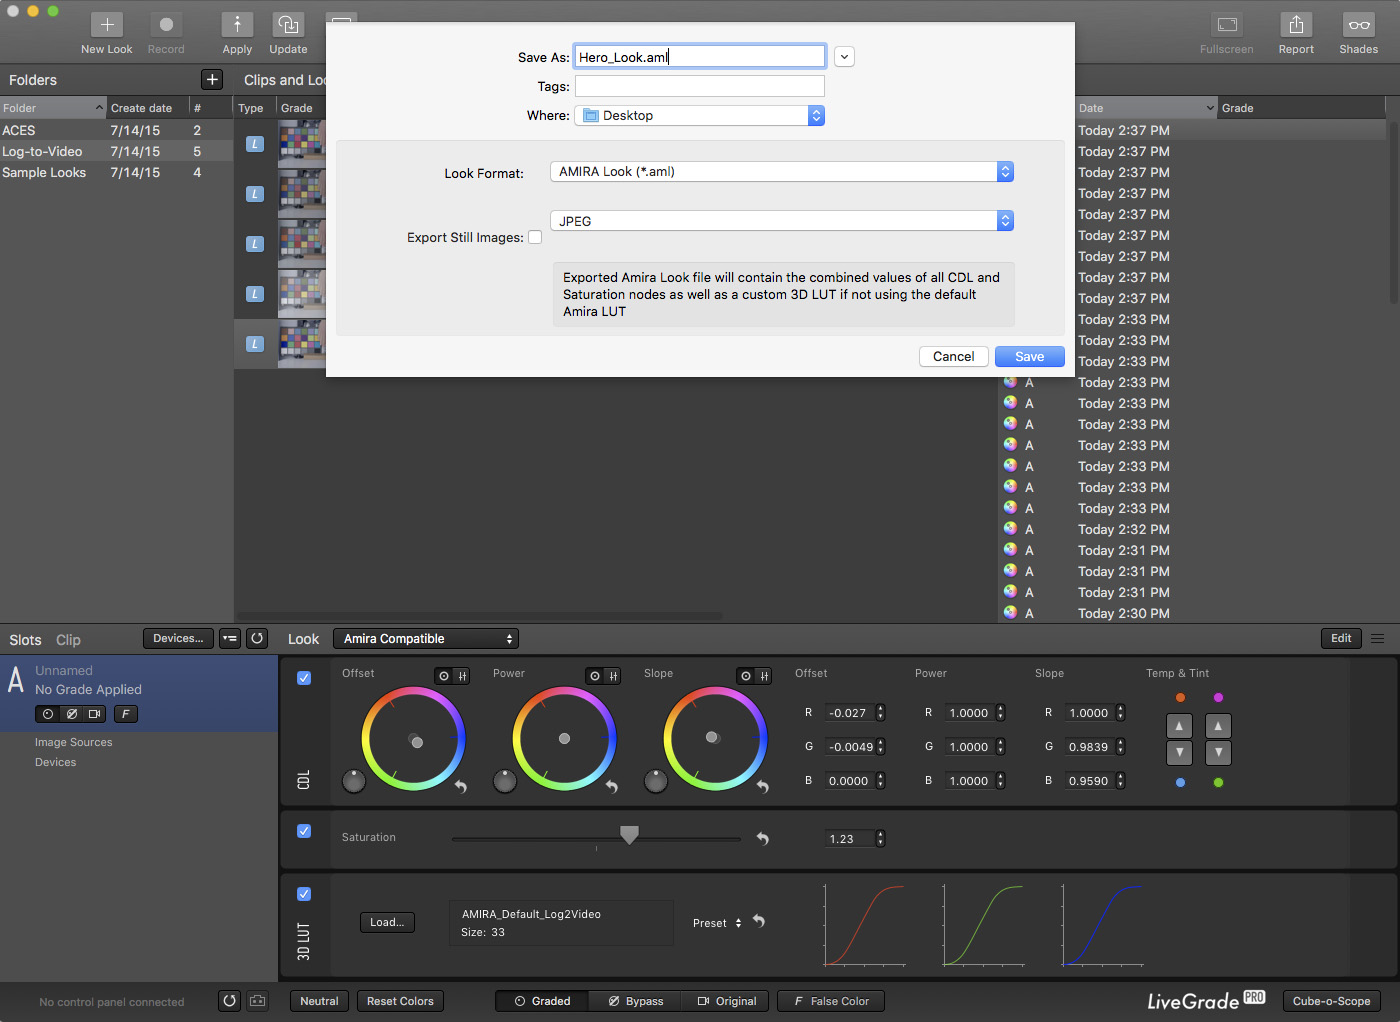
At any point during live grading, you can export the current grade from LiveGrade as an .aml file, which can then be loaded into the camera using the method detailed above in the section on DaVinci Resolve. Just choose 'Save current Grade As...' from the 'File' menu and choose 'AMIRA Look (*.aml)' from the 'Look Format' dropdown. Don't be put off by the use of the AMIRA camera name, the resulting .aml is actually compatible with both the AMIRA (cameras with the Advanced license level or higher) as well as the ALEXA Mini. Remember to make the exported .aml file's name 28 or fewer characters to be able to see it once you load it on the camera, as detailed above. This is a handy way to create a look for your project during camera testing or when shooting in a controlled environment, while enabling that look to travel with the camera when used in handheld or other scenarios where being tethered to a LUT box or the DIT cart would be impractical.
What if you have a favorite LUT for ARRI LogC that's in a format other than standard .cube? A LUT utility like Lattice can come in really handy when you want to get from one LUT format, cube size, dimension or other parameters to something else. You can even combine, or flatten, multiple LUTs into a single "super LUT." The best part is that, like LiveGrade, Lattice can write the ALEXA Mini's native .aml format directly, saving us the step of using ARRI Color Tool. This is especially helpful for LUTs that are greater than 33-sided, which can't be converted using the ARRI software. For this example, let's say we have a 64-sided (aka "64x") LUT in the .3dmesh format used by the Colorfront family of transcoding and dailies creation software.
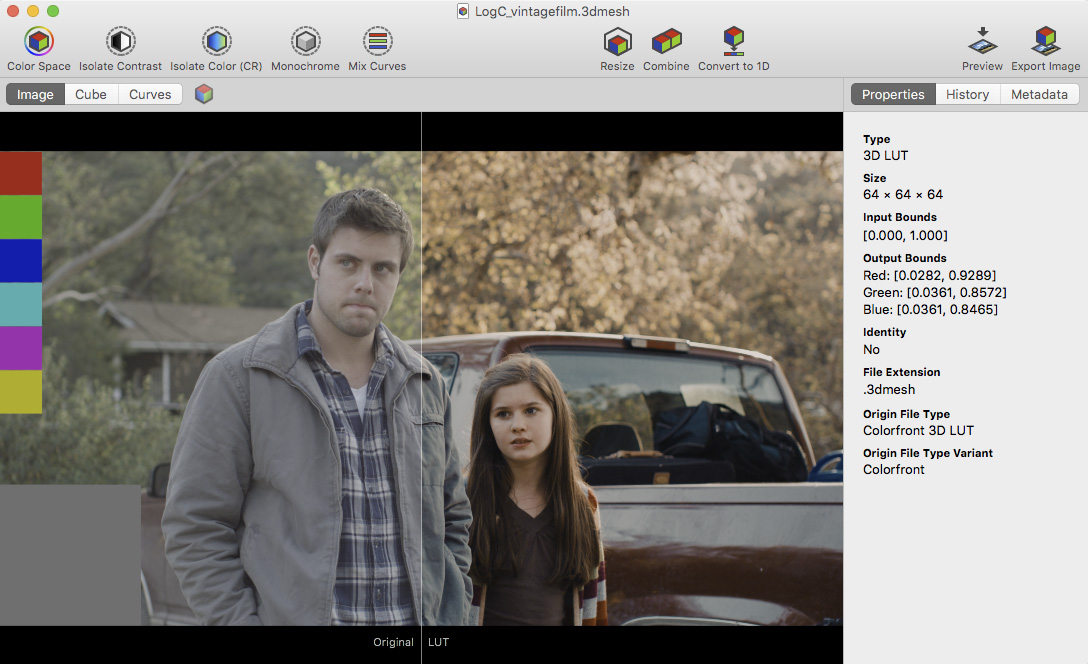 64x is generally considered to be the minimum cube resolution that would qualify as "production quality," i.e. suitable for applying to the final color/finishing pass of a project prior to rendering out the final file (or to individual clips for later re-conforming with an existing timeline). However, 64x is generally too large to be loaded directly into most cameras. Many cameras are only capable of taking 17x LUTs for use internally. Others, like the ALEXA Mini, are capable of using up to 33x LUTs as the input source for conversion to ARRI's .aml file format. Lattice will allow you to either resize the LUT independently or, when saving directly to ARRI's .aml format, will automatically resize the LUT as part of the export process. You simply open the LUT in Lattice, visually confirm using the sample image provided that everything looks good (or you can load your own image, similar to the ARRI Color Tool shown above), and choose 'Save LUT As...' from the 'File' menu.
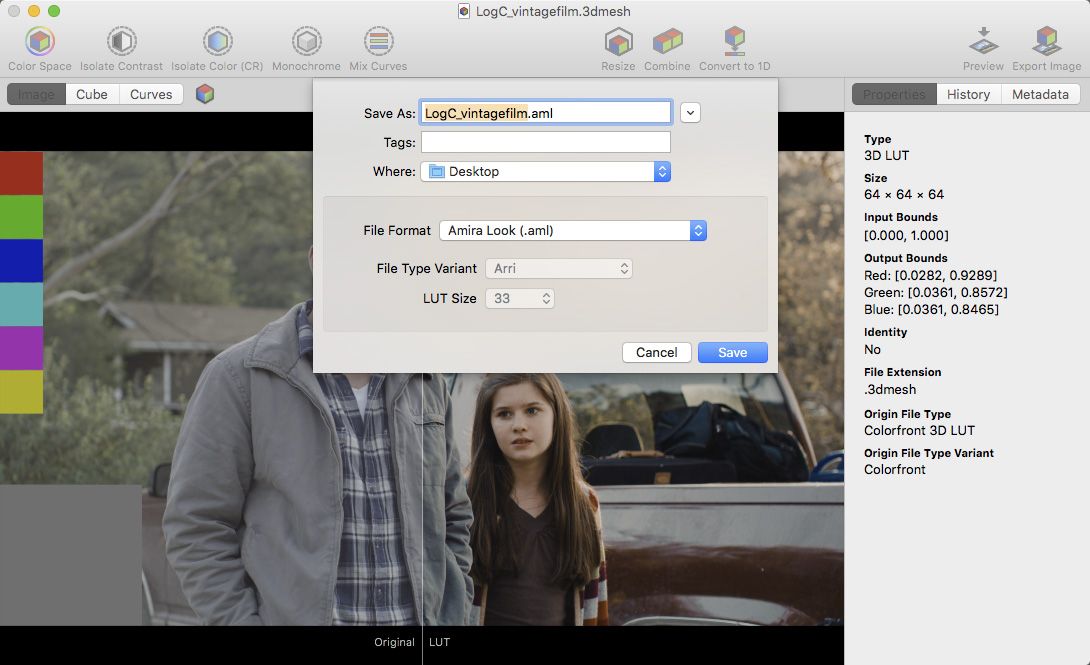 In the resulting dialog box, choose your destination for the LUT and enter a filename (28 or fewer characters as discussed above). From the 'File Format' dropdown, choose 'AMIRA Look (.aml)' and hit 'Save'. As before, don't worry about the use of the AMIRA camera name but do note that the 'LUT Size' is automatically being downsampled to 33 as part of saving our LUT in the .aml format. Copy the exported .aml file to the ALEXA Mini's USB thumb drive and load into the camera as in the earlier examples.
So there you have it, three easy ways to create a custom look for your ALEXA Mini footage that can be applied in-camera for monitoring (and later re-application in post) or "baked" into the footage for projects requiring quick turnarounds. Whether you choose to use a combination of DaVinci Resolve and the ARRI Color Tool, or other tools like LiveGrade from Pomfort and Lattice, you'll be insuring your creative vision for your project will be associated with your footage from set to post.
If you want to learn even more about LUTs, be sure to check out our LUTs 101: Theory and LUTs 201: Practical Application workshops coming up soon!






AbelCine encourages comments on our blog posts, as long as they are relevant and respectful in tone. To further professional dialog, we strongly encourage the use of real names. We reserve the right to remove any comments that violate our comment policy.
AbelCine publishes this blog as a free educational resource, and anyone may read the discussions posted here. However, if you want to join the conversation, please log in or register on our site.
We use Disqus to manage comments on this blog. If you already have a Disqus account registered under the same email as your AbelCine account, you will automatically be logged in when you sign in to our site. If not, please create a free account with Disqus using the same email as your AbelCine account.