What is ACES?
As of this writing, ACES is at version 1.1, which has brought many welcome improvements that make it a viable tool for end-to-end color management from set through post to final mastering and delivery. However, version 1.2 is “waiting in the wings” so to speak, and in fact has already been ratified and promoted to the “master” branch on the project’s GitHub page (the project itself is open source-ish, in that it can be freely copied, modified and integrated by anyone, subject to some licensing provisions). However, 1.2 has yet to be integrated into many (if any) mainstream color applications by their manufacturers. Other milestones (1.5 and 2.0) are under development as well, but for this blog we’ll be working with the “current” version, 1.1, as well as talking about a couple of big improvements coming in 1.2 (widely assumed to be part of a forthcoming beta version of DaVinci Resolve 17).
If you’ve been following ACES developments from a distance, or just haven’t checked in in a while, version 1.1 as implemented in coloring and finishing applications such as Resolve, Baselight, and others provides a robust workflow for end-to-end color management. What does that mean? It means that all camera footage for which there exists an Input Device Transform (or IDT, the basic input characterization of a camera for ACES) can be put into an ACES workflow from beginning to end (here we’re speaking about the files coming from all of the major camera manufacturers such as ARRI, Sony, Canon, Panasonic, and others). Putting your footage into an ACES workflow allows the color and brightness information, typically stored in a RAW file or a manufacturer’s Log-encoded and camera-native color gamut, to be abstracted and, crucially, normalized by the ACES pipeline. The idea is to take, ideally, RAW files, and non-destructively transform them into the ACES environment such that footage for all supported cameras is baselined to the same “master” ACES brightness and color spaces. See this GitHub folder for a current list. This allows footage from different cameras to be treated the same throughout the color and mastering stages, ending with an Output Device Transform (ODT) targeting the distribution or deployment environment for the project’s final deliverables.
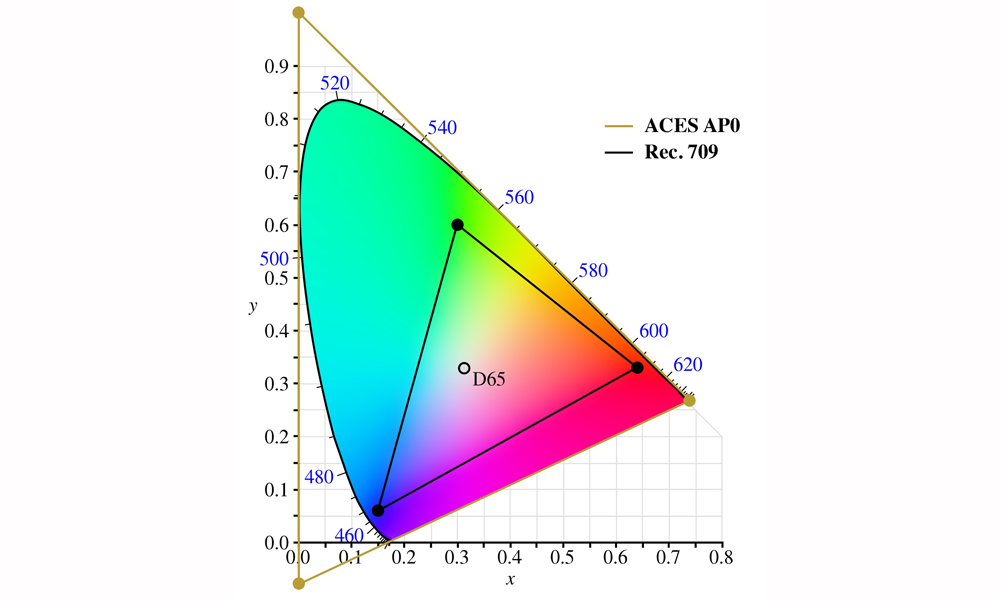
The ACES AP0 color space as compared with REC709; notice that it is a bounding triangle around the CIE chart of the visible spectrum and includes significant areas beyond the range of human vision.
In this way, ACES allows cameras to be implicitly ‘matched’ to one another, subject to some aspects of the individual implementation, by virtue of a correctly characterized IDT from each manufacturer. The IDT is the fundamental ‘ACES-izing’ component in the pipeline since it performs the translation from camera-specific color and brightness encoding to the ultra-large spaces defined as part of ACES. By transforming camera brightness and color spaces into these large “buckets,” ACES creates a level playing field where camera data is treated as purely scene-referred (and scene-linear) data values of color and brightness, rendering any given camera as more of a data measurement device than anything else. What we lose in, perhaps, romantic attachments to notions of a given camera’s “special sauce,” we get back in the form of a uniform treatment of all footage, and most importantly, uniform results when performing corrections within a color grading or VFX environment.
Working with ACES
For example, within DaVinci Resolve, my go-to environment for color correction, ACES provides a nice default film-like conversion from its native scene-linear color and brightness spaces to, for example, a standard REC709 rendering intent (implemented as an ODT) — or any other supported output format: DCI-P3, P3-D65, REC2020 (including HDR), you name it! Let’s let that sink in for a moment. The upshot is that all color corrections made to your footage, even potentially from different cameras (as long as they are described to ACES via an IDT), will be preserved and tailored to the final deliverable color and brightness (or “gamma”) spaces. This means that, for example, creating SDR, HDR, and virtually any of a growing list of deliverables can be automatically derived without re-grading from scratch. Minor adjustments will likely still need to be made — SDR, HDR, and theatrical projection differ enough to make that inevitable — but with far less work and in far less time than it would take to wholesale re-grade the footage “from scratch.” This is the true promise of ACES: multiple output targets derived from the same grades as whatever environment the project was first corrected in. ACES takes care of scaling any corrections made to your footage in a mathematically proportional way to arrive at the same “answers” — for all ACES-supported environments.
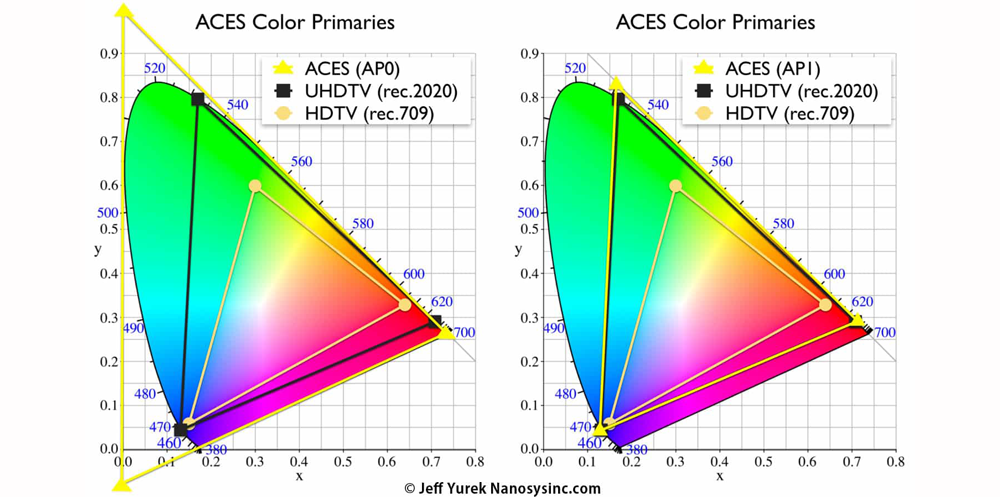
The two charts above show the relationship between the native ACES AP0 color space as compared with REC709, REC2020, and ACES AP1 “Timeline Grading Space”; AP1 is similar to REC2020 and scales easily to smaller color spaces inside the range of human vision.
Very quickly, if you’re game to dip your toe into the ACES waters, it’s become very straightforward to set up in DaVinci Resolve 16 (version 16.2.4 at this writing). And, when working with RAW camera footage from most high-end digital cinema cameras, you don’t even have to manually set the IDT — Resolve “sniffs” each clip’s metadata and automatically applies the appropriate IDT. With “baked” video footage, such as ProRes 4444 shot in a camera’s specific Log curve and color space, you do need to manually specify the correct IDT. So the ideal scenario would remain working with RAW camera footage from the same camera, or the same manufacturer’s “family” of cameras (ARRIs, REDs, Sonys, etc.), and merely flipping a couple of switches in Resolve’s Project Setting user interface (see below).
First, set the project to utilize “ACEScct” as the color science (on the Color Management page in Resolve’s project settings) and choose ACES version 1.1. Somewhat counter-intuitively, under “ACES Input Device Transform” choose “No Input Transform.” As described earlier, Resolve will auto-apply the correct transform, assuming the project is composed of RAW camera files — it’s of course possible to apply a specific IDT on a per-clip basis, such as when using ProRes or manufacturer video codes like Sony XAVC, Canon XF-AVC, etc. Then, choose the appropriate Output Device Transform under the next dropdown and specify “ACEScc AP1 Timeline Space” under the last dropdown menu. And that’s it! Import your footage and place it on a timeline, or re-link your camera-original files following importing an edit timeline, visit Resolve’s Color page and voilà, your footage will be given what I would describe as a smooth, neutral but film-like transform to ACES’ native rendering environment and should look “normal” (i.e. not like un-transformed Log — flat, milky, washed out, de-saturated, essentially mis-matched to the display it’s being viewed on) on a monitor supporting the same specs as you selected under Output Device Transform (i.e. the one you’ll be making your initial grade on, or an additional viewing environment that would be used to observe and “trim” the initial grade).

DaVinci Resolve 16.2.4 Color Management settings in Project Settings for setting up an ACES workflow (assumes RAW camera files)
The best part is, underneath the ODT (REC709 in the example above, as the display I use for color grading conforms to those specs), ACES is performing all rendering in its ultra wide-range timeline grading space. Think of it as “Log on steroids,” that we never have to look at, and utilizing a similarly gargantuan color volume, so vast that it exceeds human vision at the green and blue “corners.” All calculations are done in minimum of 16-bit (“half float”) and up to 32-bit floating point space (suitable for output to EXR files for VFX shots where the ultimate in pixel quality is required when performing compositing and other VFX tasks).
One nice bonus of this approach was that when demo R3D footage of RED Digital Cinema’s newest KOMODO camera surfaced on the web, courtesy of DP and VFX guru Phil Holland, I was able to import it into Resolve’s ACES workflow for a dead perfect match, color and tone-wise, with other R3D footage in the project. Yes, there are some subtle differences, mostly in the camera’s noise fingerprint and inherent sharpness, but since the camera uses RED’s existing IDT, tuned for their IPP2 color engine, any differences between KOMODO and DSMC2 clips were minimal at best (and, of course, it helps that RED has supported a RAW-based workflow since, oh, the beginning of time as far as digital cinema is concerned). That’s right, ACES facilitated Resolve’s support — and correct interpretation — of brand new footage from an as-yet sight-unseen camera. For those of us who’ve waited, painfully, sometimes for months for mainstream color and editing applications to support a new camera, “slick” does not begin to describe it.
The Future of ACES
Still, there is more to come from the community of engineers and color scientists hard at work on ACES. For example, today, we often use LUTs (Look Up Tables) to transform camera footage from the manufacturer’s Log and wide gamut color spaces to our viewing environment, often with a project-specific “look” applied in the bargain. Which, it turns out, is just exactly the problem with LUTs — they are too often display-referred, as opposed to scene-referred, transforms. Once you drop your favorite film print emulation LUT on your footage, going from, say, Log Cineon to REC709, forever is that footage associated with that output target (at least in the context of many color grading workflows). Any corrections made post-LUT often operate on data that has been “given a haircut” — truncated — into REC709’s limited dynamic range and modest, even by historic standards, color space. Enter the LMT — the Look Modification Transform. The same proportional math that ACES uses to normalize cameras based on their IDTs can also be used to create project, scene, or shot-specific looks, much the same way LUTs are used today, but fundamentally abstracted from this or that camera, color space, brightness curve, etc. And since these looks are operating within the confines of the ACES system, they should apply mostly equally to footage from different cameras and maintain the scene-referred context within the cavernous underlying ACES color and brightness spaces. The point is that ACES is always, categorically, working on the underlying, pristine, un-transformed data represented in the camera-original files.
This is not to say that other color management systems, or approaches, are inferior. To some extent, hardware and software manufacturers have been implementing their own bespoke versions of what I call this “agnostic abstraction” for years now (ACES debuted in 2004 and has always been an “open book” project, if not truly open source in the GPL/MIT sense of the phrase). Resolve’s own YRGB Color Managed Color Science is a good example of this. RED’s IPP2 is another, Baselight’s color management layer, and so on. (It’s worth mentioning that Baselight’s own ACES implementation is first-class as well, I’ve just not had the opportunity to use it to the extent I have with Resolve). This idea, and approach, isn’t exactly new, and plenty of the same people work both on ACES and at some kind of concerned, intertwined commercial venture. But I think it’s fair to say that ACES, and approaches substantially similar to it, are forming a fertile bed of best practices for the future. It’s sort of “written into Genesis” that the only time data gets compressed or truncated into the smaller volumes of an output target (whether REC709, DCI-P3, even REC2020) is when we click the ‘Render’ button on Resolve’s Deliver page. Since the underlying data hasn’t been changed in any way, it should also be obvious that an ACES ‘manifest’, or recipe, along with the footage itself, makes for a superior archiving and long-term storage format, truly the closest thing to a ‘negative’ that we’ve ever had in the digital age. (Did I mention that ACES also supports scanned film as a first class citizen within its ecosystem?).
A big feature of ACES 1.2 is the implementation of the ‘AMF’, ACES Metadata Format, which provides just such a recipe for how a file should be treated in post based on how color may have been done live or using a pre-loaded look. It records, among other things, the IDT used, any CDLs (Color Decision Lists, a LUT-like color metadata format defined by the American Society of Cinematographers and widely used to apply a creative look to already de-logged footage while monitoring during shooting on set), the ACES RRT (Reference Rendering Transform, a per-verison standard for normalizing all footage in an ACES pipeline), and finally the ODT used for monitoring (e.g., REC709 or DCI-P3).
And there’s still the LUT-based workflow. Implemented carefully and correctly, LUTs can be a part of, or even the basis of, a first-class color-managed workflow. The idea is to apply standardized transforms at the right point in the order of operations. A good example would be Colorfront’s approach, spearheaded by industry luminary (‘chrominary’?) Bill Feightner. Their color science utilizes ARRI LogC and the ALEXA wide gamut RGB color space as a sort of equivalent intermediary space for the baselining of other manufacturer’s Log-encoded and native camera gamut color spaces. Then, some classic starting point looks can be applied and tweaked from there. It uses an Output Transform to a number of popular formats, but only at the very end, the last node in the chain, similar to where, logically, an ACES ODT would go. My take away from working with LUTs at this level is that a) not all LUTs are created equal and b) a number of people are really, really good at making them. And my favorite LUT utility, Lattice (a sort of Swiss Army Knife for the inspection and conversion of LUTs), recently introduced a feature in version 1.8.4 to allow LUTs to be adapted to an ACES workflow using the ‘CLF’, or Common LUT Format, also a feature of ACES 1.2.
Conclusion
I hope that this overview of the current state of the ACES multiverse has shed some light on why you might want to try it out on an upcoming project — especially if that project needs to deliver to multiple formats in relatively short order. A list such as the following is not uncommon today: an SDR REC709 version, HDR P3-D65 version (in HDR10, HDR10+ and/or Dolby Vision), DCI-P3 for the creation of a DCP for theatrical exhibition, and an uncompressed EXR framestack of the entire show, both with and without color grading applied.
ACES is at the point where it is both here today and increasingly representing the future of end-to-end color management for projects at all levels of the business. There’s never been a better time to get started with this remarkable, and surprisingly simple, workflow. Keep an eye out for future blog posts and possibly classes on this hot topic!
Visit ACES Central for more information and additional resources.
